

How to connect a car battery (troubleshooting) – connect 2 12-volt batteries & BMS connection
Car battery wire connection – simple and safe diagram
Objective: avoid sparks near the battery and protect the alternator.
- Connect the red cable (+) to the positive terminal of the battery.
- Connect the other end of the red (+) to the charger / second vehicle.
- Connect the black cable (−) to the negative terminal of the full battery (or charger).
- Finish with the chassis ground (unpainted metal part) of the broken-down vehicle, away from the battery.
Why? This car battery wire connection limits the risk of explosion due to hydrogen gas.
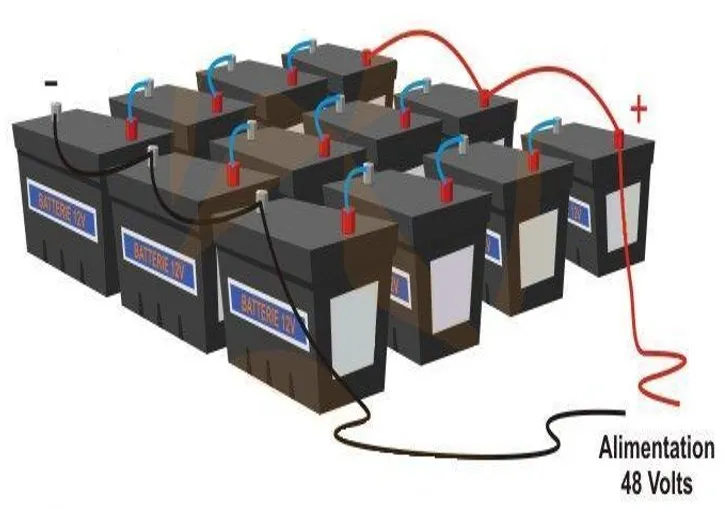
Connect 2 12-volt batteries: series or parallel?
Parallel (12V maintained, capacity ↑)
- + to +; − to − (e.g. 2×12V 100Ah → 12V 200Ah).
- Ideal for increasing autonomy (solar/wind, fridge, lighting).
Series (voltage ↑, capacity identical)
- + from the 1st to − of the 2nd (2×12V 100Ah → 24V 100Ah).
- Ideal for reducing currents in long lines.
Golden rule: same technology, age, capacity, and health condition. Balance cable lengths and install a fuse near each battery.
Battery BMS connection (LiFePO4 / lithium)
The battery BMS connection protects against overcharge, undervoltage, and overcurrents.
- Disconnect all sources (charger, panel, inverter).
- Connect the B− terminal of the BMS to the negative pole of the pack (common).
- Connect the BMS balancing wires to the intermediate points of the cells (follow the BMS manual, order B− → B1 → B2 … → B+).
- The P− (or C−) of the BMS becomes the negative output to load/charger.
- Install circuit breaker and fuse on the positive side, as close as possible to the pack.
Tip: for ready-to-use lithium batteries (integrated pack), simply connect +/− to your system; the BMS is already internal.
Troubleshooting: car breakdown, how to connect car battery with cables
- Red (+) on the discharged battery, then red (+) on the full battery.
- Black (−) on the full battery, then black on chassis ground of the broken-down vehicle.
- Start the broken-down vehicle, let it run, then remove the cables in reverse order.
Never reverse polarities. Turn off consumers before the operation.
Cable section table (12V, round trip ≤ 3 m)
≤ 15 A2.5Lighting, small devices 30 A6Medium consumers 50 A10Low power inverter 80 A16Medium inverter 120 A25Inverter 12V ~1000–1500 W 160 A35Inverter 12V ~2000 W 200 A50Starting, significant peaks
Indicative: increase the section if the length is greater, if the ambient temperature is high, or to limit voltage drop < 3%.
Understanding battery lifespan
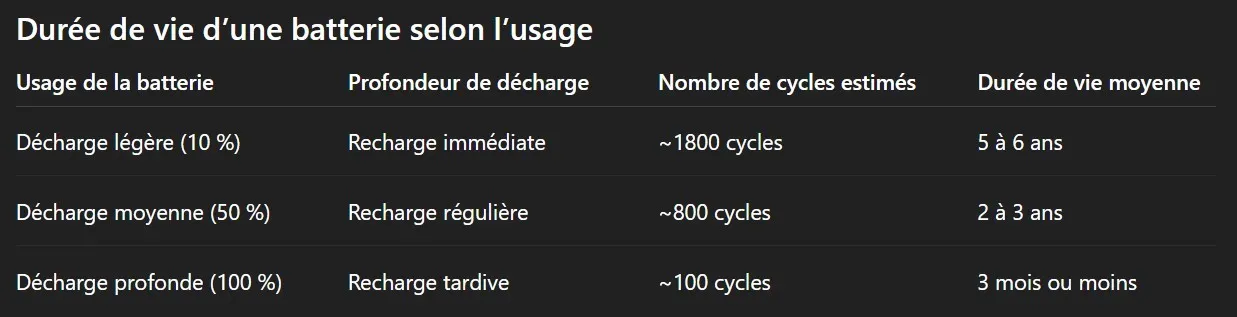
The lifespan of a battery directly depends on how it is used. The less it is stressed, the longer its longevity. A battery degrades with use, especially when it is regularly discharged to 100%.
👉 Concrete example :
- If you use a 250Ah battery at only 25Ah per cycle (i.e., 1/10th of its capacity) with a moderate discharge of 2.5A, and you recharge immediately after use, you can achieve up to 1800 cycles (or about 5 to 6 years of lifespan).
- Conversely, a battery fully discharged every day without complete recharge may wear out in just 3 months, or even less. This situation damages the battery and is not covered by the manufacturer's warranty.

⚙️ How to connect a battery correctly?
Incorrect connection can cause a short circuit, damage the alternator, or lead to an accident. Here are the essential steps to connect or recharge a car battery or a stationary battery:
✅ Classic battery connection:
- First, connect the red cable to the positive (+) terminal of the battery.
- Then, connect the red cable to the positive terminal of the charger or the second vehicle.
- Next, connect the black cable to the negative (−) terminal of the battery.
- And finally, connect the other end of the black cable to a non-painted metal part of the vehicle's chassis (avoid areas near the battery).
➡️ This method allows you to limit the risk of sparks near the battery and avoid an explosion due to hydrogen gas emitted during charging.
How to connect a car battery?
Correctly connecting a car battery is essential to avoid any risk of accident or damage to the alternator.
👉 Here are the steps to follow:
- First, connect the red cable to the positive (+) terminal of the battery.
- Then connect the red cable to the positive terminal of the charger or the second vehicle.
- Connect the black cable to the negative (−) terminal of the battery.
- Finish by connecting the other end of the black cable to a non-painted metal part of the chassis.
➡️ This method is the safest to limit sparks and avoid the explosion of gases emitted by the battery.
How to connect a 12V battery?
For a 12V battery, the principle remains the same:
- Red = positive (+)
- Black = negative (−)
Always start by connecting the positive, then the negative.
💡 Tip: use cables suitable for the amperage of your 12V battery to avoid overheating.
Connecting multiple batteries in parallel
Parallel connection increases the capacity (Ah) without changing the voltage.
- Example: two 12V 100Ah batteries in parallel → you still get 12V, but with 200Ah.
- This configuration is ideal for solar or wind installations that require high autonomy.
👉 Steps for parallel connection:
- Connect the positive (+) terminal of the first battery to the positive (+) terminal of the second.
- Connect the negative (−) terminal of the first battery to the negative (−) terminal of the second.
- Then connect your usage cables to the terminals of one of the batteries.
⚠️ Warning: all batteries must be of the same type, voltage, and capacity.
Connecting a battery with a solar panel
To connect a battery to a solar panel, it is essential to use a charge controller.
- Connect the solar panel to the controller (red to +, black to −).
- Then connect the controller to the 12V battery (red to +, black to −).
- Turn on the controller to start charging.
➡️ Never connect a solar panel directly to a battery, as this may overcharge and damage it quickly.
🚫 How NOT to connect a battery:
- Never make direct contact between the terminals or reverse the red cable and the black cable.
- Never connect the positive terminal to the chassis.
- Never disconnect a battery without cutting the power.
🔌 Disconnect a battery safely:
- Always start with the negative terminal (−).
- Then, disconnect the positive terminal (+).
- If you are installing a new battery, do the reverse: connect the positive first, then the negative.
🧰 Use with a battery charger:
- Ensure the charger is off before connecting the cables.
- Connect the red to the positive terminal and the black to the negative terminal.
- Turn on the charger once the connections are secure.
🚗 In case of a vehicle breakdown – jumper cables:
- Connect the red cable to the positive terminal of the dead battery, then to the positive terminal of the full battery.
- Then, connect the black cable to the negative terminal of the full battery.
- Connect the other end of the black cable to a metal ground on the broken-down vehicle (not to the negative terminal).
✅ Tips to extend lifespan:
- Recharge immediately after use, do not leave an empty battery.
- Avoid repeated deep discharges.
- Check the terminal lugs regularly and clean them.
- Monitor the ambient storage temperature.
📌 Summary:
- The correct connection prevents damaging the alternator, the circuits, or the battery itself.
- Always use the correct cables (red / black).
- Follow the instructions to charge a battery, disconnect a battery, or start your car safely.